jjjjjjjjjjjj
Featured

    Featured Posts

Google start drone delivery 2019 in australia

Australia is the 'world's most advanced' country in terms of drone delivery, where the first commercial services will start from 2019. In the news agency Xinhua report, it was reported that Wing, a subsidiary of Google's parent company,

Alphabet, announced that its commercial drone home-delivery service will be launched in the Australian Capital Territory (ACT) next year.
The services from Drones will be provided by the company in a 5-kilometer range from its base, located in Mitchell, the northern suburbs of Canvra. Chief Executive Officer of the Wig James Ryan Bergidge said that 12 rotor drones for delivery have been designed keeping in mind the safety.

Two satellites made in Japan and Europe, scheduled for Mercury, will take so many years

Each drone weighs 4.5 kilograms and can carry up to 1.5 kilograms weight. On the ground, operators will monitor different flights, while drones will fly automatically to their destination.

Burgij told the media, "We have a high level of automation. Drones in a disturbance or emergency will be able to make decisions before any human intervention and it is capable of doing safe casualty work. However, a supervisor will immediately take control of the drone as and when necessary. Initially 30 business connected with the drone delivery service.

How to ADD Social Icons for Blogger Metro Style 2016 HINDI


today I am going to show how you can add Metro Style Social Icons with Hover Effect to your blogger blog. I have seen this widget many a times in different WordPress blogs so I thought of converting it for blogger. This widget has a very simple working. On hover the opacity of the icon changes and makes is more translucent.

This widget can help your blog gain more social media optimized audience

A live working demo of this widget can be seen below.
Please see that the container will not be in one line as shown here. It will be like the one shown in the pic above.


Adding in Layout


  • To add this widget's code go to Blog Title → Layout → Add Widget → HTML/JavaScript and paste the given code in the box opened.


<center>
<ul id="abt-social-icons">
<li class="rss-icon"><a href="http://feeds.feedburner.com/FEEDID" target="_blank"><img height="147" src="https://blogger.googleusercontent.com/img/b/R29vZ2xl/AVvXsEhJjz7jGsPJMbAydBMUR1s5W18smBeNMLm6ArEn1XA_Sv7VpEfwkdN_nd4XHsaL_JPTUfO407oyTaE63sZVNUW4XiCb6dzwJpJy7w-o1U6SWD3Bl_9jFoPiF_AZ_QZ1Xux5Mb3r8G0vBpw/s1600/rss.png" width="147" /></a></li>
<li class="twitter-icon"><a href="http://www.twitter.com/TWITTERHANDLE" target="_blank"><img height="147" src="https://blogger.googleusercontent.com/img/b/R29vZ2xl/AVvXsEglZqoSe5v86epVZGv2pK8OKGrbwXirRMLaiX4ONN-ds-0BJX3Joi7mMdHVqXxTneYidXP6FlE9DHy-PLlpzOF-OgkOl3xRRMKcTgmgjDwnom1HVYS8U0oEILZ7bvjgSryIlcqi3sVoNZg/s1600/twitter.png" width="147" /></a></li>
<li class="facebook-icon"><a href="http://www.facebook.com/PAGEID" target="_blank"><img height="147" src="https://blogger.googleusercontent.com/img/b/R29vZ2xl/AVvXsEh05xEiM-gBwjChWqXa6DEbbN9_8cW-A_XL075TTW2h95FGLNuBbQ8PuytcMmwWvpDUq5oS5SzsVgEOX7xHV0Iarce2eeZK02hd58qTLHcRj42PUm3ioqCIeXv2W44edEEmBvnMDd_fmbk/s1600/facebook.png" width="147" /></a></li>
<li class="google-icon"><a href="https://plus.google.com/YOURID" target="_blank"><img height="147" src="https://blogger.googleusercontent.com/img/b/R29vZ2xl/AVvXsEgBiYpSk53aHN5Fmn5TWgJhDv5PTBgMhsQDm63kY_WB2GRoeUpOGwUcWhkb4roBxJCAy38RAKP3yBxdDP-LfVc_b-jrMRndBxmQAbv1ksKVt1jC5IPxLwsSyzZMSXFgchkKADrBRCbF7Bs/s1600/google.png" width="147" /></a></li>
</ul>
</center>
<style>
#abt-social-icons li {
 float: left;
 width: 147px;
 height: 147px;
 margin: 0 6px 6px 0;
 padding: 0 0 0 0;
 border-bottom: none;
        list-style: none;
}
#abt-social-icons li a {
 line-height: 1px;
 display: block;
}

#abt-social-icons li a:hover img {
 -webkit-opacity: 0.8;
 -moz-opacity: 0.8;
 opacity: 0.8;
}

#abt-social-icons li a span {
 display: none !important;
}
</style>


After adding the code change the Link in BOLD RED with your own IDs. Now save the widget and ultimately save the template.

You are done now. Now you and your visitors can see this awesome and elegant Metro Style Social Icons in your blogger blog.

Hack Someone's computer LAPTOP Fastest wayS of haking

Well as I already mentioned u can hack any system as it is conected to what we call INTERNET . To connect internet a system allocates a port for communication and Data Transfer. SO here it goes all we goto do is get into that port thats hacking.

steps: -

1.Download software PORT SCANNER Also you could use port scanner from Nettools. Download link on my blog or just Google for it
2.Copy the IP address of the victim whose port is open.
3.Download NETLAB which gives you all information including the victim ip address and area from where he is accessing internet.
4.Paste the ip of victim u found initially into NETLAB .Thats it u access his system.

Click here to download NETLAB  NETLAB (torrent link from piratebay.org) 
" SO THAT I CAN ADD MORE STUFF LIKE THIS ,PLEASE RATE ME AND GIVE 

How to Hack Wi Fi Password using android phone crack TIPS 2016

using android phone how to hack wifi password on android phone how to hack wifi password without software how to hack wifi password in windows 7 how to hack wifi password in mobile how to hack wifi password on laptop how to hack wifi password using android how to hack wifi password on android
This tutorial teaches you how to hack wifi passowrd in just 10 to 15 minutes. This tutorial explains How to Hack or Crack Wifi Password. This hack will work on hacking WEP encryption password.

So guys tighten your belts for new hack and lets start hack wifi.


STEPS TO HACK WIFI OR WIRELESS PASSWORD

1. Get the Backtrack-Linux CD. Backtrack Linux Live CD(best Linux available for hackers with more than 2000 hacking tools inbuilt). (FREE !!)
Download Backtrack Linux Live CD from here: http://http://www.backtrack-linux.org/downloads/
Video for how to hack wifi password using android phone

2. SCAN TO GET THE VICTIM

Get the victim to attack that is whose password you want to hack or crack.
Now Enter the Backtrack Linux CD into your CD drive and start it. Once its started click on the black box in the lower left corner to load up a "CONSOLE" . Now you should start your Wifi card. To do it so type

airmon-ng

You will see the name of your wireless card. (mine is named "ath0") From here on out, replace "ath0" with the name of your card. Now type

airmon-ng stop ath0

then type:

ifconfig wifi0 down

then type:

macchanger --mac 00:11:22:33:44:55 wifi0

then type:

airmon-ng start wifi0

The above steps i have explained is to spoof yourself from being traced. In above step we are spoofing our MAC address, this will keep us undiscovered.

Now type:

airodump-ng ath0


Now you will see a list of wireless networks in the Console. Some will have a better signal than others and its always a good idea to pick one that has a best signal strength otherwise it will take huge time to crack or hack the password or you may not be able to crack it at all.
Once you see the networks list, now select the network you want to hack. To freeze the airodump screen HOLD the CNTRL key and Press C.


3. SELECTING NETWORK FOR HACKING

Now find the network that you want to crack and MAKE SURE that it says the encryption for that network is WEP. If it says WPA or any variation of WPA then move on...you can still crack WPA with backtrack and some other tools but it is a whole other ball game and you need to master WEP first.


Once you've decided on a network, take note of its channel number and bssid. The bssid will look something like this --

00:23:69:bb:2d:of

The Channel number will be under a heading that says "CH".


Now in the same CONSOLE window type:

airodump-ng -c (channel) -w (file name) --bssid (bssid) ath0


The file name can be whatever you want. This file is the place where airodump is going to store the packets of info that you receive to later crack. You don't even put in an extension...just pick a random word that you will remember.

Note: If you want to crack more than one network in the same session, you must have different file names for each one or it won't work. I usually name them as ben1, ben2 etc.

Once you typed in that last command, the screen of airodump will change and start to show your computer gathering packets. You will also see a heading marked "IV" with a number underneath it. This stands for "Initialization Vector" but in general terms all this means is "packets of info that contain characters of the password." Once you gain a minimum of 5,000 of these IV's, you can try to crack the password. I've cracked some right at 5,000 and others have taken over 60,000. It just depends on how long and difficult they made the password. More difficult is password more packets you will need to crack it.


4. Cracking the WEP password

Now leave this Console window up and running and open up a 2nd console window.
In this window type:

aireplay-ng -1 0 -a (bssid) -h 00:11:22:33:44:55 ath0

This will send some commands to the router that basically it is to associate your computer even though you are not officially connected with the password. If this command is successful, you should see about 4 lines of text print out with the last one saying something similar to "Association Successful :-)"

If this happens, then good! You are almost there.

Now type:
aireplay-ng -3 -b (bssid) -h 00:11:22:33:44:55 ath0

This will generate a bunch of text and then you will see a line where your computer is gathering a bunch of packets and waiting on ARP and ACK. Don't worry about what these mean...just know that these are your meal tickets. Now you just sit and wait. Once your computer finally gathers an ARP request, it will send it back to the router and begin to generate hundreds of ARP and ACK per second. Sometimes this starts to happen within seconds...sometimes you have to wait up to a few minutes. Just be patient. When it finally does happen, switch back to your first Console window and you should see the number underneath the IV starting to rise rapidly. This is great! It means you are almost finished! When this number reaches AT LEAST 5,000 then you can start your password crack. It will probably take more than this but I always start my password cracking at 5,000 just in case they have a really weak password.

Now you need to open up a 3rd and final console window. This will be where we actually crack the password.
Now type:
aircrack-ng -b (bssid) (filename)-01.cap

Remember the file name you made up earlier? Mine was "Ben". Don't put a space in between it and -01.cap here. Type it as you see it. So for me, I would type wepkey-01.cap
Once you have done this you will see aircrack fire up and begin to crack the password. typically you have to wait for more like 10,000 to 20,000 IV's before it will crack. If this is the case, aircrack will test what you've got so far and then it will say something like "not enough IV's. Retry at 10,000."
DON'T DO ANYTHING! It will stay running...it is just letting you know that it is on pause until more IV's are gathered. Once you pass the 10,000 mark it will automatically fire up again and try to crack it. If this fails it will say "not enough IV's. Retry at 15,000." and so on until it finally gets it.

If you do everything correctly up to this point, before too long you will have the password! now if the password looks goofy, dont worry, it will still work. some passwords are saved in ASCII format, in which case, aircrack will show you exactly what characters they typed in for their password. Sometimes, though, the password is saved in HEX format in which case the computer will show you the HEX encryption of the password. It doesn't matter either way, because you can type in either one and it will connect you to the network.

Take note, though, that the password will always be displayed in aircrack with a colon after every 2 characters. So for instance if the password was "secret", it would be displayed as:
se:cr:et

This would obviously be the ASCII format. If it was a HEX encrypted password that was something like "0FKW9427VF" then it would still display as:

  0F:KW:94:27:VF  


Just omit the colons from the password, boot back into whatever operating system you use, try to connect to the network and type in the password without the colons and presto! You are in!

It may seem like a lot to deal with if you have never done it, but after a few successful attempts, you will get very quick with it. If I am near a WEP encrypted router with a good signal, I can often crack the password in just a couple of minutes.

I am not responsible for what you do with this information. Any malicious/illegal activity that you do, falls completely on you because...technically...this is just for you to test the security of your own network.</div>

BEST TIPS :how to change mobile imei number software

mobile imei change software nokia imei changer mobile imei tracker how to change mobile imei no how to change mobile imei number imei change tool imei change software download imei change iphone android imei without box android apk tool exe download android imei change code android imei changer motorola NOKIA apk free download mtk engineering mode apk samsung imei changer apk imei changer tool imei changer software samsung imei changer hide my root apk imei changer apk full

IMEI Changer App Free Download


Changing the IMEI No of the Phone
Change Means How Other Application gets the IMEI No of the device using below code


TelephonyManager telephonyManager = (TelephonyManager)getSystemService(Context.TELEPHONY_SERVICE); telephonyManager.getDeviceId();


As you all know,The Value is not permanent as it is an Xposed Module 
Download

IMEI Changer.apk


Screenshots


OLD Value
Old Value

New Values
New Values
Dialer (*#06# for getting IMEI No)
Dailer IMEI
In Settings Page About Phone

How to HACK ANY Blogger Account website password best tips

hacking into blogger account how to hack blogger template how to hack blogger blog how to hack blogger website how to hack blogger page views cara hack blogger hack blogspot password get hack blogspot account

 FRIST METHODS - 

This simple tutorial will help to teach to how to hack a blogger website this tutorial is exclusively provided by the author of the thexfirebug. This is a awesome tutorial is help you to hack a blogger website. The information is provided in the site is only for educational purpose only.Implement this information in your own risk, blogger.howfn.com is not take responsibility of this information.


So here it is.....
First you go to the blog that you want to hack like
........blogspot.com

Now here we are using google loop hlo to hack the blogger website.
What we are using ,actually if you know blogger provide atom feed facility by using this facility only we're going to hack blogger website.
Now we,re inject javascript to ".........blogspot.com". LIKE

.........blogspot.com/atom.xml?redirect=false&start-index=1&max-results=500
A atom.xml(xml file)  file will download or a bunch of text will load in the browser
If text loads copy the text and paste in notepad and create a file with .xml format [This is because you are using old browser]
Here you are ready to Create a copy of the blog you want.Just follow these steps .....
  1. First login to your blogger account 
  2. Then go to setting 
  3. There you can see the import option using that upload the xml file 

( It will take a little depending on the post content)

 SEC. METHODS - 

UPDATE SOON....

How to Change Template in Blogger 7 EASY STEP tips

html blogger templates blogger templates free how to change template in blogspot how to change blogger template width how to change blogger template background color

It is not that hard to change the template of your Blogger blog, just go to your Blogger dashboard and follow the steps told here. You can click on the thumbnails below to see larger versions of screen shots.  

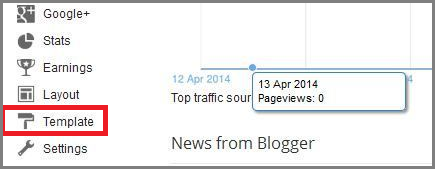
  • First of all login to your Blogger account and choose your blog (if you have more than one), than click on "Template" section.


if also you have template then upload it -


You will see a big input box with full of codes at "Template" section. Click somewhere in that box then hit your CTRL and A buttons together to select all text in the box. After selecting whole text, hit the DELETE button on your keyboard to clear old template codes.
  • Open your theme.txt (which comes out of your downloaded template archive package) with a text editor like notepad and again select all text by hitting CTRL and A buttons on your keyboard, then hit CTRL and C keys together (or right click with your mouse and select copy) to copy whole text to your clipboard.

  • Go to "Template" section, and paste your new template codes to the input box by hitting CTRL and V keys together (or right click with your mouse and select paste), then click "Save Template Changes".

  • After saving process finished, click "Republish".

Important!

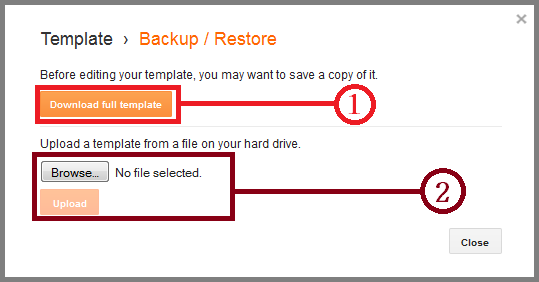
I recommend you to backup your old template codes before deleting them in this step. In order to backup your old template select all codes in the template codes box (CTRL+A), copy (CTRL+C) and paste (CTRL+V) them in a new text file with appropriate file name.

How to a Gmail Account create 6 Step easy ways simple

Gmail 


Gmail is a popular web-based email service provided by Google. Learn the basics of how to compose, send, and respond to emails, then explore Gmail's features for managing your email and accessing it from your mobile device.

Introduction

Lesson 1
Gmail is a free email service provided by Google. In many ways, Gmail is like any other email service: You can send and receive emails, block spam, create anaddress book, and perform other basic email tasks. But it also has some more unique features that help to make it one of the most popular email services on the Web.
In this lesson, we'll talk about some of the features and advantages of Gmail, and we'll give an overview of the Gmail window

To create a Google account:

  1. Go to www.google.com. Locate and select the Sign in button in the top-right corner of the page.
    Screenshot of Google.com
  2. Click Create an account.
    Screenshot of Google.com
  3. The signup form will appear. Follow the directions by entering the required information, such as your name, birthdate, and gender.
    Screenshot of Google.com
  4. Review Google's Terms of Service and Privacy Policy, click the check box, then click Next step.
    Screenshot of Google.com
  5. The Create your profile page will appear. Click Add a photo if you want to add a photo to your Google+profile. If you don't want to set a profile photo at this time, click Next step.
    Screenshot of Google.com
  6. Your account will be created, and the Google welcome page will appear.
    Screenshot of Google.com

www.CodeNirvana.in

Copyright © Blogger | Blogspot tips tricks, Templates, Seo, Tutorials and widgets, How to | How To Learn Blogging. | Designed By Code Nirvana